I had to make this cake for a boy, and wanted it to be just great!

I tried to do it like this, and had a photo of each step, so I hope this tutorial for camouflage cake will help you.
First find the camouflage pattern you like and transfer it on a sheet of wax paper. Use toothpick, pencil or fondant tools to transfer it from wax paper on fondant (there is a photo of how I do that on My little pony cake tutorial)
Choose your colours, mine were light and dark green, sand and dark brown.
First, roll a sheet of lighter green. It can be a bit smaller then you need 'cause you will put more layers of fondant. ( but, don't make it too small, at the end if it's not good, you can't just knead it and roll again).

Use your pattern and cut shapes of dark green.


Repeat this on lighter brown fondant.


And again on dark brown fondant.


Then cover your cake.
If necessary glue the edges of pieces on base and smooth the fondant with this
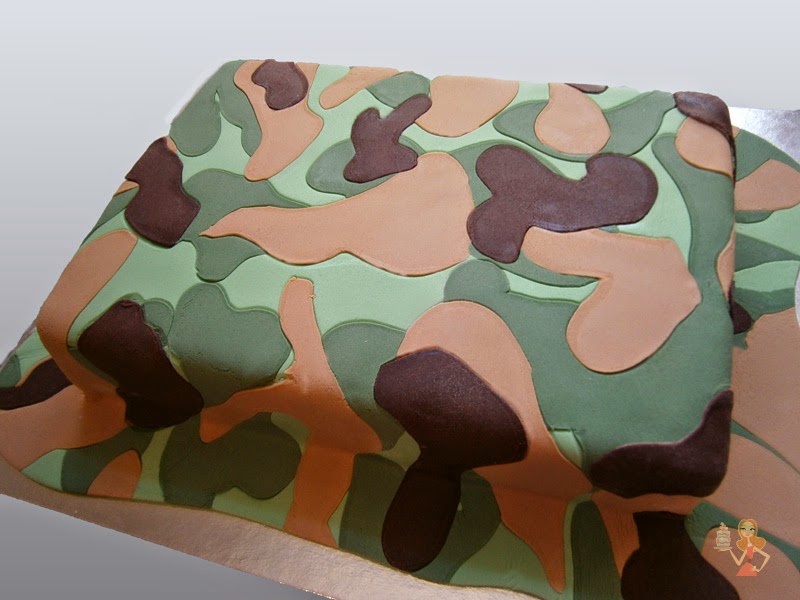
Add the details on a cake. I've put a soldier and tent.
Hi, this article was shared in Facebook, and I am so excited because I am going to make a camouflage cake for my husband's birthday next weekend.
ReplyDeleteMay I ask how you came up with the colors? the dark green, light green, brown and black? Is there a particular brand that you use for color, do I have to mix a couple of colors to achieve a particular one? I also plan to include a tan color, any suggestions on how to achieve tan?
Sorry for all the questions, I am very new with fondant and how to color them.
I look forward to hear from you, thanks so much for your time!!
~Anna
Hi! I'm glad that this tutorial is helpful :)
ReplyDeleteI always buy premade black, red and brown (chocolate) fondant. I found that I could never make those colours look that good.
All other colours I get by mixing white fondant and gel colours. I use Wilton gel colours and one US brand that a friend sent me (I'll check what it is and let you know).
For dark green I've used Moss green colour, for light green I've used leaf green and a little moss green, brown was chocolate fondant, beige is yellow and just a little brown mix. For tan you could try Ivory colour.
The best way to get a right colour is to mix a small amount of colours, 'till you are satisfied with the result.
Hope you're husband will have a great birthday and that you both will be satisfied with the cake.
Please, feel free to share the photo of your cake! I'm looking forward to see it!
Thanks for your reply! I'm excited to start on it :)
ReplyDeleteYour tips and suggestions are greatly appreciated!
Warm regards,
A
I am soooo glad I found this post! I have seen this techniche done with zebra print before, and thought about trying it for an upcoming camo cake I have to do... I wasn't sure though exactly how to make the camo print to look authentic and not just a whole bunch of blobs smooshed together. This is fantastic! Thank you so much!
ReplyDelete- Becky
Thank you. I'm glad that I could help!
Delete